
FAKE ID PHOTO INSTRUCTIONS
Taking a good photo for a fake ID is not easy. Many factors determine whether your fake ID will pass or not. The most important thing is to have the right type of camera with you, because if it is not a high-quality camera, then the picture will be blurry, and this can make it very difficult to get past the bouncer at the bar.
It doesn’t matter how good your fake ID looks, or how much you spent on it — if the photo is bad, you’re busted. That’s why we put together this quick guide on how to take a great fake ID photo.
We’ve used these techniques for years and have never been caught once. To start with, make sure you have all the necessary supplies:

The best way to take a good photo for a fake ID is to use a DSLR camera. You can also use a smartphone, but the images won’t be as clear.
If you don’t have access to either of these devices, then you can use any digital camera.
You should take multiple photos until you find one that works well.
Getting the Basics Right
- The first thing you’ll need to do is find a well-lit area that has good lighting. This can be at home or outside. If it’s too dark, then the picture will not turn out properly and the security features won’t be able to scan your face correctly.
- Once you have found a good area, it’s time to start taking pictures! You’ll want to take several pictures from different angles so that you have options when making your final selection.
- Make sure that there are no people or objects in the background of your photo when taking pictures for your fake ID card because this can cause problems when scanning and processing images for verification purposes.
Things to keep in mind while taking a picture for a fake ID
It’s easy to ruin your fake ID. Whenever taking a picture for a fake ID note that the keywords are “corporate” and “neat”. Follow these simple steps and you will be on your way to clicking the perfect fake ID picture.
1. Clean Background

Your image needs to have a plain background. A white or light gray plain background, preferably. Choose a wall, backdrop, cloth, or bedsheet that has a flat color (no textures or patterns). Additionally, having a plain background will save you a ton of work when you get to editing your picture.
2. Don’t Wear Dark Colors
This is especially important if you plan on using a blacklight-revealing pen (more on that later). You may think it looks cool, but any decent bouncer can see you coming from a mile away. Stick to lighter colors like white or yellow, which tend not to show up well under blacklights anyway.
3. Proper Positioning
Positioning is critical to success here. Nearly all IDs in the world are clicked by people well-versed in taking shots that are exactly the same except for the change in subject.
How do they produce similar results? Is it likely that you can reproduce those results? Well, to some extent you can. Here are some positioning tips that can help you mimic an authentic ID or passport photo.
⦁ Stand around 1.4 meters away from the camera/tripod or the person taking your photo.
⦁ Your head should be at the horizontal and vertical center of the image.
⦁ Do not tilt your head. Keep your body posture relaxed yet upright. Ensure sufficient distance between the head and shoulders.
4. Make Sure There are no Shadows on your Face or Body
If there is any stray light falling across your face from above or below, it will create a huge shadow in the wrong place — like right over your eyes! It’s better to take the photo inside with the flash turned on, but if you must take the photo outside in the direct sun, wait until the sun goes down so there won’t be any harsh shadows across your face or body.
5. Get Someone Else to Take the Picture for You
Friends will usually oblige if they’re around when you need them most. Someone else taking your photo generally results in a better output (except when you are taking casual filtered selfies, perhaps). If you have a friend around, give them the directions and have them click instead.
Editing your picture
Any picture has to be edited. Once you have selected the best shot in which your head is centered, you have no expression, the background and your attire have no spots/colors, there are no objects around you, your head is perfectly straight and aligned with your neck, etc., it is now time to open it in a photo editing software.
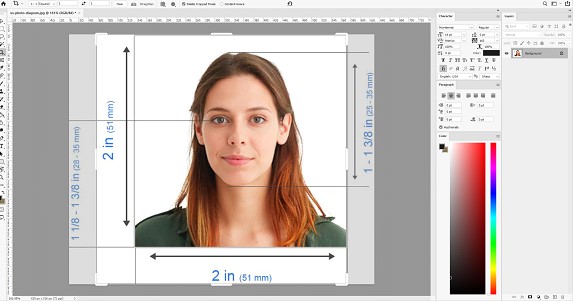
If you just have cropping needs on an otherwise perfect photo, use an online tool for passport photos to crop. The final photo should be 51 mm x 51 mm or 2” x 2”. The head must be centered between 25 mm and 35 mm or 1” and 1.4”. For a more versatile editing process, Adobe Photoshop is the recommended tool of the trade.
Patch, using the Spot Healing Brush Tool, any minor inconsistency in the background or around you to make the backdrop appear spotless and neat. Use the same tool to get rid of any irregularities on your face as well.
Note that moles, acne, pimples, etc. should stay. Editing can also help you make imperfect pictures perfect. Here is how to use Photoshop to fix common fake ID picture problems.
Things to NOT do when clicking a picture for a fake ID
Note that the purpose of an ID picture is to see each and every facial feature properly. As long as you keep that in mind you will know what to do. The exceptions to this are if you have to wear head coverings for religious or medical reasons. If you want to learn more about how your fake ID should look you can refer to our fake id reviews page to look for samples.